Account security is vital for companies who are giving their teams access to software that contains valuable company information. For any organization, it’s important for team members to have the tools they need to perform their jobs on a daily basis. At the same time, it can be difficult to keep track of accounts, ensure employees are using secure passwords, and verify that account access isn’t being shared with others.
At Float, account security for our customers is one of our biggest priorities. That’s why we’re excited to offer SAML SSO login for our Professional Plan members, and multi-factor authentication for all Float customers.
What is SAML SSO?
User management can be a headache, especially for large companies or those who are scaling. The reality is, employees come and go and keeping track of accounts and logins can be quite difficult – not to mention, it poses a security risk too.
SAML enables Single Sign-On (SSO) and provides increased security and convenience for companies by allowing for just one set of secure login credentials across platforms, including Float. SAML works by passing information about users, logins, and attributes between the service providers and identity providers (iDp) including Azure, Okta, Auth0, and OneLogin.
For Professional Plan members, Float uses SAML to securely pass authentication and authorization from your identity provider to Float for a secure Single Sign-On experience!
The Benefits 🤩
Employee onboarding or offboarding 👋🏼
IT and security teams can seamlessly manage users in the organization.
Greater convenience 👍🏼
Employees only need to sign into one platform. No need to remember multiple usernames and passwords!
Increased security 👀
SAML SSO is one of the most secure ways to enable account access for companies and teams.
We’ve got more tech acronyms for you!
Have you heard of MFA? No? 🤷🏼♂️ Well hear us out! Multi-factor authentication (MFA) provides basic authentication for your company’s team. It works to improve account security and prevent unauthorized login attempts by requiring an additional “factor” to verify that the person logging in is really who they say they are. 🧐
This can include a text message with a unique code or a one-time-password (OTP) issued by a third party authenticator app such as Google Authenticator.
The Key Benefit: Increased Security
By adding an additional checkpoint for a user login, you protect the company from hackers getting access through compromised passwords.
Here’s how it works ⬇️
To set up SAML SSO
SAML SSO is available to Professional Plan members. (Not yet on our Professional Plan? Upgrading is easy! Just contact our Support team and we’ll walk you through the process of coming to the Professional side.)
Head to your Settings page and click “Account Security”. From here, you’ll be asked to enter your identity provider’s information and connect to Float.
Visit our Help Centre for more detailed instructions on setting up SAML SSO.
To set up MFA
Did you know MFA is available to all Float customers?! Here’s how you can enable it:
Go to your company “Settings” page and click “Account Security”. From there you can configure your login policies with our MFA settings.
Once enabled, the next time your team logs into Float, they will be prompted to set up MFA and choose either text or OTP as their second factor for login security.
After that is complete, they will be prompted to enter their one-time code or password.
Visit our Help Centre for more information on setting up MFA.
At Float, we’re bringing you one step closer to smarter, more secure spend management. 👊🏼 If you have any questions about enabling SAML SSO or MFA, we’re a click away!
Are you a Canadian business owner tired of chasing employees for missing receipts over email, slack, or tools like HubDoc or Dext? Do you dread the month-end scramble to reconcile expenses? You’re not alone. Let’s explore Best Receipt Inbox Solution to Minimize Employee Chasing and how it can transform your financial processes and save you valuable time and resources.
The Receipt Compliance Challenge in Canadian Businesses
Receipt compliance is a crucial aspect of financial management for Canadian companies. It ensures that all employees, regardless of their position, meet the receipt requirements set by finance teams. However, many businesses struggle with:
Time-consuming receipt collection
Last-minute submission rushes at month-end
Incomplete or lost receipts
Difficulty enforcing expense policies across departments
Are you a Canadian business owner tired of chasing employees for missing receipts? Do you dread the month-end scramble to reconcile expenses? You’re not alone. Let’s explore how modern expense management solutions can transform your financial processes and save you valuable time and resources.
Legacy Receipt Inbox Tools
There are a handful of legacy receipt inbox tools on the market today that many Canadian businesses are still using:
None of these are the perfect solution as they introduce a ton of manual work for the Finance teams and your employees.
The Receipt Compliance Challenge in Canadian Businesses
Receipt compliance is a crucial aspect of financial management for Canadian companies. It ensures that all employees, regardless of their position, meet the receipt requirements set by finance teams. However, many businesses struggle with:
Time-consuming receipt collection
Last-minute submission rushes at month-end
Incomplete or lost receipts
Difficulty enforcing expense policies across departments
Introducing Float: A Game-Changer for Canadian Expense Management
Float, a Canadian fintech company, offers an innovative solution to these common challenges. Their Expense Policy feature is designed to streamline receipt compliance and simplify expense management for businesses across Canada.
Key Features of Float’s Expense Policy
Customizable Receipt Requirements: Set specific rules for different expense categories.
Automatic Card Pausing: Cards can be automatically paused when receipt compliance isn’t met.
Real-Time Notifications: Employees receive prompts to submit receipts immediately after purchases.
Cost Savings: Reduce the risk of fraudulent or non-compliant expenses.
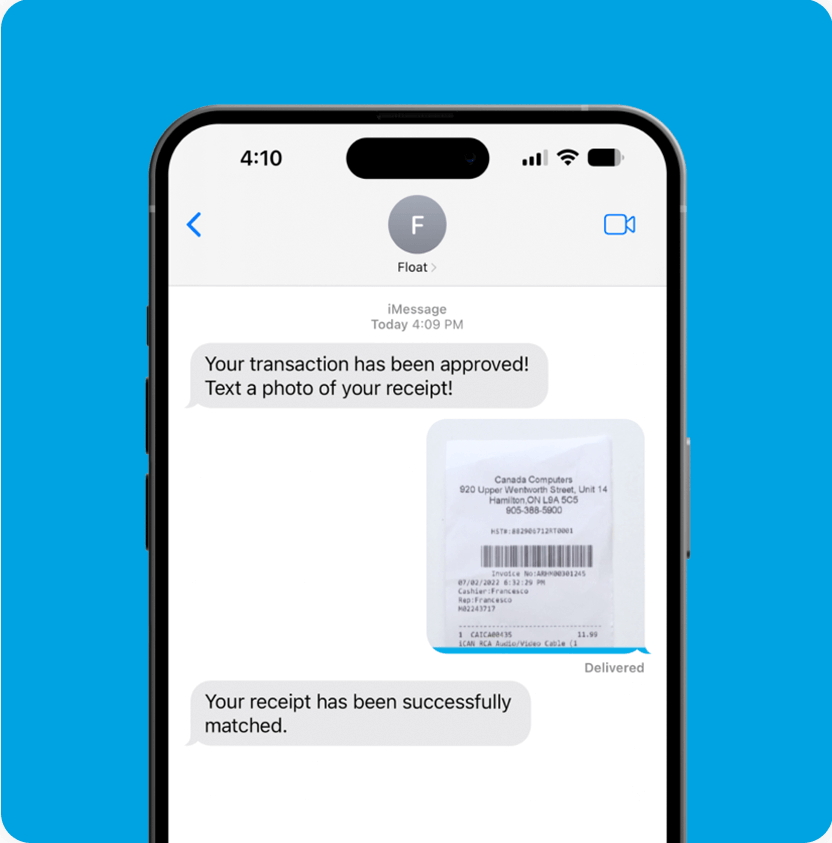
Simple Receipt Submission Process
Float’s user-friendly system makes receipt submission a breeze:
Employee makes a purchase using a Float card.
Float sends an automated text or email link.
Employee uploads the receipt and fills in purchase details.
Finance team can easily review and categorize the expense.
Why Canadian Businesses Should Consider Float
In today’s fast-paced business environment, Canadian companies need efficient financial management tools. Float’s receipt compliance feature offers:
Real-time expense tracking
Simplified accounting and reconciliation
Reduced risk of lost receipts
Improved employee accountability
Time savings for finance teams and employees alike
Conclusion: Elevate Your Expense Management Game
For Canadian businesses looking to streamline their financial processes, Float’s innovative expense management solution offers a powerful answer to the receipt compliance challenge. By implementing this system, you can free up valuable time, improve financial accuracy, and focus on growing your business.
Ready to transform your expense management? Explore how Float can tailor its solutions to meet the unique needs of your Canadian business and drive smarter financial decisions today.
—
Float is Canada’s only all-in-one corporate cards, reimbursements, and bill pay platform that helps customers:
Earn cashback on all categories of spend and save on FX
Generate 4% interest on funds held with Float
Eliminate expense reports and receipt chasing
Close the books 5x faster at the month-end
Want to learn how companies like Clutch, Neo, Knix, and 1,000s of other Canadian businesses on average save 7% of their monthly spend with Float? Get started with Float today by clicking the button below!
More often than not, company expense policies have not evolved. Employees will make a business purchase using personal funds, submit the necessary information to get it approved by finance, and later get reimbursed via payroll. That’s a lot of administrative overhead (and delayed financials). That’s why we’ve put together this Guide to a Modern Expense Policy.
With Float, finance teams can modernize their expense policy and become more proactive about their spending. But first…
What is an expense policy?
An expense policy is a set of guidelines that clearly defines:
Acceptable and unacceptable business expenses
Processes for expense approval and reimbursement
This framework helps finance departments quickly validate expenses and gives employees a clear understanding of permissible spending.
Benefits of having expense policies
Implementing an expense policy offers numerous advantages:
Provides a structured approach to control company-wide spending
Standardizes rules for expense management
Prevents non-compliant expenses
Assists finance teams in efficiently evaluating spend requests
Enables senior management to control costs and forecast spending accurately
With everyone aligned on the company spending guidelines, senior management is better able to control costs more efficiently and calculate spending forecasts.
Types of Expense Policies
Expense policies can vary based on company size and industry. Some businesses opt for a broad, all-encompassing policy, while others create specific policies for:
Travel
Entertainment
Departmental expenses
Key Components of an Expense Policy
A comprehensive expense policy typically includes:
Expense Categories: Different types of expenses that employees can incur, like travel, meals, accommodation, or office supplies.
Spending Limits: Clear limits for each expense category, specifying the maximum amount employees can spend without additional approvals.
Approval Process: The steps employees must follow to obtain approval before incurring expenses, including any documentation required.
Documentation Requirements: The supporting documents, such as receipts or invoices, that employees need to submit along with their expense reports.
Reimbursement Procedures: How employees should submit expense reports, including the required forms or software systems.
Non-Reimbursable Expenses: Expenses that are not eligible for reimbursement, such as personal expenses, fines, or alcohol.
Travel and Accommodation Guidelines: Guidelines for booking flights, hotels, and rental cars, including preferred vendors and any travel-related policies.
Expense Audit and Compliance: The process of auditing expense reports and the consequences of non-compliance with the policy.
What’s the downside?
While essential, traditional expense policies can lead to challenges.
High administrative overhead
Recent industry research reveals startling figures about corporate expense management:
Typical businesses handle over 50,000 expense reports annually
The cost of processing these reports can exceed $500,000 per year
Companies spend around 3,000 hours yearly fixing errors in expense reports
Correcting a single expense report costs an additional $50+ on average
Nearly one in five expense reports contain errors or missing information
For small businesses, the average time to approve an expense report is over a week
About a quarter of expense reports don’t comply with company policies
Almost half of small businesses lack clear procedures for handling non-compliant expenses
These figures highlight a pressing need for improvement in expense management processes. As a business owner, you’d likely address any other system with such a high failure rate immediately. It’s time to give expense management the same attention and upgrade it for better efficiency and accuracy.
Employee Dissatisfaction and Frustration
Recent research by Allstar Business Solutions reveals alarming trends in employee expense claiming habits.
According to the study, over a third of workers never claim back expenses, with 58% avoiding claims under £5 (SmallBusiness.co.uk, 2018).
The survey of 2,001 British workers uncovered significant gender disparities, with women claiming less than half the amount men do on average.
Furthermore, 25% of employees have postponed or cancelled meetings to avoid out-of-pocket expenses, while 64% describe the claiming process as frustrating.
These findings highlight the urgent need for businesses to streamline their expense management processes, as inefficient systems not only impact employee satisfaction but can also hinder business growth by discouraging necessary expenditures.
The Future of Expense Policies: Automated Solutions with Float
Enter Float – a revolutionary solution that automates expense policy implementation. With Float, you can:
Set spending boundaries directly on company cards
Ensure automatic compliance with company guidelines
Prompt cardholders to upload receipts and expense information in real-time
Issue cards to all team members without worry
Gain real-time visibility and control over company-wide spending
Here’s how:
✅ Approve spend before it happens
Multi-level Approval policies based on your company’s organization structure lets employees easily request to make a purchase from managers (with an audit trail).
🤖 Automatically collect receipts and GL codes
Submission Policies let you define the information employees are required to submit with each transaction, like receipts and GL codes, and will pause cards without them.
🛡️ Protect your company from unauthorized spend
Individual card controls like Merchant Controls let you restrict spending at certain merchant categories and custom Recurring and Temporary limits ensure your company doesn’t get overcharged.
📉 Get insights into your cash flow
Float’s Reporting feature provides a real-time overview of company spending with insights into who is spending what.
Conclusion: Revolutionize Your Expense Management
Don’t let outdated expense policies hold your business back. Embrace the future of expense management with automated solutions like Float. By implementing smart, efficient expense policies, you can take control of your company’s spending while fostering growth and innovation.
—
Want to learn more about Canada’s smartest corporate cards and business spend software? Get our Spend Management Guide at the link below.
In today’s fast-paced business world, marketing teams need to be agile and responsive. However, managing marketing expenses can often slow things down. A well-crafted marketing expense policy is crucial for balancing financial control with the flexibility marketers need. Let’s explore how Float, a leading expense management solution, can help Canadian marketing teams optimize their spending while adhering to company policies.
The Importance of a Marketing Expense Policy
A marketing expense policy is a set of guidelines that outline how marketing teams can spend company funds. It typically covers:
Approved categories of marketing expenses
Spending limits for different activities
Approval processes for various expense types
Documentation requirements for reimbursement
Having a clear marketing expense policy helps:
Control costs
Ensure compliance with company and legal standards
Streamline the approval process
Provide transparency in marketing spending
Common Challenges in Marketing Expense Management
Marketing teams often face unique expense management challenges:
Frequent small purchases for digital ads
Varied expenses for events and campaigns
Need for quick approvals on time-sensitive opportunities
Difficulty tracking ROI on marketing spend
How Float Revolutionizes Marketing Expense Policies
Float’s innovative expense management platform addresses these challenges head-on, helping marketing teams implement and adhere to their expense policies more effectively.
1. Easily request cards for marketing spend 🙌🏻
Your marketing team needs to be able to make strategic decisions fast, without any bottlenecks. Our Expense Policy features enable Finance Admins to give marketing team leaders the authority to set spending limits on cards and quickly approve spend requests from their staff.
You can log into Float at any time and easily request a single use virtual card for purchases like swag orders, props for shoots or photography equipment. For advertising and software subscriptions, you can request a recurring virtual card. Virtual cards are issued instantly and accepted everywhere VISA and Mastercard are – all you have to do is simply copy and paste the card details into the vendor’s billing details page.
2. Instantly create a virtual card by vendor 💳
Create a virtual card by vendor to easily categorize the types of recurring online spend your marketing team is making. A virtual card for every vendor gives you the option to create daily, weekly or even monthly recurring cards with assigned budgets. For example, if you know that your Facebook ad spend is $40K/month, you can create a recurring monthly card with that limit.
A virtual card by vendor allows you to:
💵 Set monthly budgets for specific marketing activities 👀 Easily track and control spending over the month ☑️ Set limits to every card to ensure spend isn’t exceeded ✋🏽 Ensure vendors don’t overcharge the card without your authorization 💳 Avoid disrupting other subscriptions or payments when you pause or cancel a card
3. Use physical cards for real world expenses 💳
The finance team can issue a physical card to each marketing team member who has on-the-go expenses for travel, conferences, or client meetings. Float offers unlimited physical cards to Professional plan members, and with the ability to set card limits and apply automated expense policies, there’s no reason to hold out.
Cardholders are automatically reminded to easily send Float receipts and assign pre-defined GL codes as soon as the purchase is made, eliminating month end expense reports and reconciliations.
4. Track spending in real time without any guesswork ✅
Managing corporate spending closely is on everyone’s minds right now. If your finance team doesn’t have a smart solution in place, it’s likely taking over their 9-5. 🤯 Using Float, marketing leaders can log into the platform at any time and monitor their team’s spending in real time. Expenses like Google ads, travel costs and even miscellaneous expenses like morning coffee and lunch are all visible and categorized by vendors too! Gone are the days of asking for budget updates over Slack and tracking spend through a spreadsheet. Float makes everything available for you right on the dashboard. No guesswork, no errors and no stress! 👍🏼
Managers can also assign auto-tags to clearly define each employee’s role and spending authority. As for the finance team, Float grants them full visibility over what every department is spending, what they’re purchasing and whether their budgets need to be increased.
5. Collect and manage receipts in a flash – literally. 📸
With so many transactions being made, marketing teams typically generate a ton of receipts. Float makes it easy to stay on top of those receipts through our SMS receipt upload and email receipt feature. Spenders can simply snap a picture of their receipt and upload it into the platform immediately after a transaction! And if they don’t, managers have the option to send out automated reminders until a receipt is submitted. No more chasing employees down! 🏃🏻♂️ Float also provides the option to tag expenses by vendor or category and add additional notes to every receipt submission so that managers know exactly what the purchase was for.
—
Float is Canada’s only all-in-one corporate cards, reimbursements, and bill pay platform that helps customers:
Earn cashback on all categories of spend and save on FX
Generate 4% interest on funds held with Float
Eliminate expense reports and receipt chasing
Close the books 5x faster at the month-end
Want to learn how companies like Clutch, Neo, Knix, and 1,000s of other Canadian businesses on average save 7% of their monthly spend with Float? Get started with Float today by clicking the button below!
In today’s competitive business landscape, finding ways to cut costs without sacrificing quality is crucial. One often overlooked tool for business savings is a corporate card solution. Let’s explore five easy ways your company can leverage this financial tool to boost your bottom line.
1. Streamline Expense Management for Significant Business Savings
Traditional expense management can be a drain on resources. A corporate card solution automates this process, leading to substantial business savings:
Reduce time spent on manual expense reports
Minimize errors in expense tracking
Lower administrative costs associated with reimbursements
By streamlining expense management, businesses can save up to 55% on processing costs per expense report, according to a study by PayStream Advisors.
2. Capitalize on Cashback and Rewards Programs
Many corporate card solutions offer cashback or rewards programs, providing an easy way to generate business savings:
Earn cashback on everyday business expenses
Accumulate travel points for business trips
Redeem rewards for office supplies or equipment
For example, if your business spends $10,000 monthly on a card offering 1.5% cashback, you could save $1,800 annually – a significant boost to your business savings.
3. Leverage Spending Controls for Better Budgeting
Corporate cards allow you to set spending limits and restrictions, helping to enforce your budget and increase business savings:
Set monthly spending caps for different departments
Restrict purchases to specific merchant categories
Prevent unauthorized expenses
These controls can lead to a 10-15% reduction in overall company spend, according to a report by the Aberdeen Group.
4. Gain Visibility for Strategic Business Savings
Corporate card solutions provide real-time spending data, allowing for more informed financial decisions:
Identify areas of overspending quickly
Negotiate better rates with frequently used vendors
Adjust budgets based on actual spending patterns
This increased visibility can help businesses save up to 23% on travel and entertainment expenses alone, as reported by American Express.
5. Eliminate Foreign Transaction Fees for International Business Savings
For companies doing business globally, a corporate card solution can offer significant savings on international transactions:
Avoid foreign transaction fees, which can be up to 3% per transaction
Get better exchange rates compared to local currency conversions
Simplify reconciliation of international expenses
These savings can add up quickly for businesses with frequent international transactions, contributing to overall business savings.
Maximizing Your Business Savings with the Right Corporate Card Solution
To fully realize these business savings, consider the following when choosing a corporate card solution:
Look for High Rewards Rates: Choose a card that offers competitive cashback or points on your most common expenses.
Evaluate Fee Structures: Opt for cards with low or no annual fees to maximize your business savings.
Consider Integration Capabilities: Select a solution that integrates with your existing accounting software for seamless expense management.
Assess Spending Control Features: Ensure the card offers robust controls to help enforce your expense policies.
Check International Benefits: If you do business abroad, prioritize cards with favorable international transaction terms.
Here are five ways Float can help your business save money
1️⃣ No surprise fees
When you spend with Float, you won’t have any surprises – there are no foreign transaction fees, and no hidden monthly fees. Additionally, you can issue unlimited virtual cards as needed… without additional charges. What does this mean? The only charges you’ll see each month are the expenses incurred by your business – no additional fees, and no surprises.
2️⃣ 1% Cashback & 4% Interest on Deposits
It’s true! For each purchase you make with your Float physical and virtual corporate cards, you’ll get one percent cash back. Depending on your team’s monthly spend, this adds up to significant savings. Some Float customers regularly receive tens of thousands of dollars in cash back – with no strings attached – deposited into your Float account monthly.
3️⃣ Spend controls that are easy to implement
While Float allows you to issue unlimited physical and virtual corporate cards, you’re able to limit the spend on each individual card – providing you a level of proactive control over your organization’s spend that traditional corporate cards don’t offer.
4️⃣ Track real-time spend by vendor
Tracking vendor spending is a tedious process of waiting for invoices, processing payments, and logging the transactions. It’s asynchronous, and doesn’t offer a real-time view into what your suppliers are spending.
Since you control the spend limit on each card, you can set up your vendors with a virtual corporate card with a spend limit in line with their typical monthly spend. This also allows you to track their spending, and increase or decrease their spend limits in real time as needed. This not only ensures that vendor payments are happening on time and on budget – meaning you won’t be overcharged – saving you time and money.
5️⃣ Set approval structures
Still need peace of mind? Float customers are able to set up multiple expense approval processes to ensure that even if a vendor or employee needs a credit top-up, spend is still monitored, and can be approved on the fly… even via Slack.
💰 Bonus! Earn up to $150k in special offers from Float partners
Becoming a Float customer is simple. Applications take just five minutes online, and you can be approved in a few days. Compared to a traditional approval timeline of four to six weeks for traditional credit cards, it’s not just a financial savings – it’s a time savings. Plus, Float’s perks program provides some pretty sweet bonuses… adding up to $150k in additional savings for your company.
Here are just a few:
Intercom offers a FREE first year, a 50% discount in your second year, and an ongoing 20% discount as long – a value of $61k USD
Amazon Web Services provides $25k USD in AWS Activate Credits along with a year of AWS Business Support – a value of $5k USD
Hubspot is offering 30% off a subscription for the first year, and 15% each subsequent year – a savings of up to $35k USD
With this many opportunities to save, what’s stopping you from booking a demo?
Conclusion: Boost Your Business Savings with Smart Corporate Card Use
Implementing a corporate card solution can be a game-changer for your business savings strategy. By streamlining processes, capitalizing on rewards, enforcing budgets, gaining spending insights, and reducing international fees, you can significantly cut costs and improve your financial health.
Remember, the key to maximizing business savings with a corporate card is choosing the right solution for your specific needs and using it strategically. With the right approach, your corporate card can become a powerful tool in your arsenal for financial optimization and business growth.
—
Float is Canada’s only all-in-one corporate cards, reimbursements, and bill pay platform that helps customers:
Earn cashback on all categories of spend and save on FX
Generate 4% interest on funds held with Float
Eliminate expense reports and receipt chasing
Close the books 5x faster at the month-end
Want to learn how companies like Clutch, Neo, Knix, and 1,000s of other Canadian businesses on average save 7% of their monthly spend with Float? Get started with Float today by clicking the button below!
Ready to scale your business and ditch the growing pains? Axe your overly complex approval processes and make company spending easier with Float’s Team Management feature.
We saw the need for an efficient feature that helped startups and SMEs decentralize the expense management process, distribute responsibility across teams and give employees greater autonomy to spend. At the same time, we also know how critical it is for finance teams to maintain oversight or control over corporate spending. So, we created Team Management to tackle it all! 👊🏼
Team Management — a feature available through our Professional Plan — enables users to set up “teams” within the platform that are structured to align with their approval policies. It helps you formalize your spend approval structure and fully automates the approval process by team, spend type and amount. You can easily set up teams in Float based on departments such as Marketing, Sales and IT, or by geographic location. For instance, this is helpful if you have a Toronto-based office and a Vancouver-based office, or multiple office addresses in one city.
How to set up teams within Float 👩🏽💻 1. Start by determining how you want to track and approve expenses based on your approval policies. For example, if every department manager is responsible for approving employee expenses, create your teams based on department. 2. Identify who in your organization will be assigned as a “Manager” in Float. Add them as a user and assign them the “Manager” role. 3. Continue to add other team members as “Spenders.” 4. Create a team whose expenses are routed directly to the assigned “Manager.”
Create a Team in Float
Each team can have a number of managers or members attached to it. Managers also have full visibility into the spending of the team and can participate in the approval process too. On the other hand, spenders only see their own transactions but always follow the approval process that is assigned to their team.
Add users to Float
Creating your own multi-level approval structure 💸 Once your team is added into Float, you can create a designated approval policy that’s specific to a team or your company as a whole.
Create your approval policy
Using our platform, you can set up approval policies to mimic your company’s existing expense policies and set automated approval flows by spend amount or spend type. You can also create multiple levels of approval for higher spend amounts, one-time purchase or recurring expenses. For example, you can permit a Marketing Manager to approve all expenses under $2,000 and for anything over that amount, you can create a second level of approval that goes through the Finance department. ✅
This feature gives managers more visibility over team spending with the power to set predefined budgets, distribute corporate cards and approve spend requests in seconds! Employees can also log into Float and easily submit spend requests from managers, who can be notified via Slack, email or text. Once approved, virtual cards can be instantly set up and employees can request top-ups if needed. 💳
It’s a win-win for everyone 🤩 Float allows for faster, smarter and more efficient spending all around! 🙏🏽 The ability to set up teams and multi-level approvals provides long-term value for the entire company:
Greater accuracy and control 👍🏼 Managers have a better view of where money is going, how it’s being spent and who is spending it, while the finance team still has control over corporate spending.
Adds speed and efficiency 🚀 A seamless spend approval process means easier and quicker expense management and happier employees who can make transactions in a flash.
Promotes a decentralized structure 💳 Managers gain greater authority to track and oversee team spending, while employees have the flexibility to make business purchases on demand without a lengthy chain of approvals.
Ready to give Float a try? Get started with us today!
Is month-end craziness bogging you down? Float offers a powerful two-way integration with QBO to make spend management a breeze!
Our QBO integration feature packs a punch, offering a range of benefits to make managing your finances easy as 🥧. You can look forward to
✍🏽Improved transaction categorization
✅ Better receipt management
⏱ Time saved with less manual data entry
We designed this feature to sync seamlessly into your daily workflow. Our goal was to optimize the month-end process for your finance team so they could finally say goodbye to low-value tasks and guesswork. Our QBO integration feature makes it so that you no longer have to re-add and retype data with the reassurance of greater accuracy in your books – not just at month-end but on a daily basis! 🚀
With Float’s QBO integration, you manage all card-linked transactions in Float, and then directly export into Quickbooks, with transactions automatically coded and reconciled for you. Once you try it, you’ll wonder how you lived without it!
Currently using Quickbooks to manage your corporate finances? Here’s how Float levels up your experience and your books:
3 ways to automate spend management using our QBO feature 🙌🏻
👩🏽💻 Auto-apply category transaction settings and pre-code cards by GL, Vendor, Tax or Tag
✅ Set up merchant-based rules to enable auto-categorization by merchant or vendor
💳 Bulk update hundreds of transactions for purchases that have similar accounting settings
QBO manages your receipts better – with tax included 🧾
Float allows every employee to submit receipts via email, text or direct upload into the platform. Once a receipt enters the system, Float uses Optical Character Recognition (OCR) to pull the tax and tip off a receipt for easy and simple tracking. We know that some Canadian provinces have unique tax rules, and so we created this feature to accommodate multi-part tax codes and auto-recognize them every time a receipt is exported. 👍🏼
We know that so many SMEs and startups are using Quickbooks. That’s why our main goal is to easily integrate into every part of your work day so that managing your finances is a responsibility that’s easy, shared and simple to track.
To learn more about Float’s QBO integration feature, book a demo with us today!
Float is Canada’s first smart corporate card and spend management software that provides businesses with real-time control and visibility over company-wide spend. We provide businesses with an unlimited number of high-limit Visa corporate cards tethered to our spend management software.
What does Float’s spend management software do?
Simplicity for bookkeepers by moving the entire spend management function into one single platform with added visibility, control and sharing capabilities 🤩
In-depth analysis of company spending with real-time data 👀
Elimination of expense reports and other manual tasks like reconciliations with automatic receipt collection and matching 🙅🏻♀️
Improved accuracy by minimizing human error and expense fraud ☑️
A healthier company spend culture with greater productivity and communication 💸
Empower employees to easily spend and request approvals for what they need with smart approval flows 🙌🏻
How does Float improve the spend management process?
✅ Physical and virtual corporate cards
Float offers both physical and virtual corporate cards that directly link to our spend management software. Our cards provide full visibility of usage and spend, they link directly to your General Ledger, enable simple and fast card issuance and seamless reconciliation. They’re straightforward for employees to use because of their pre-approval workflow and help administrators control budgets and dictate how much money is being spent and where. Virtual cards are accepted and function like physical credit cards and reap the same cash-back benefits. They offer high levels of efficiency, visibility and control, which traditional cards lack.
✅ No more expense reports
We understand that filing expense reports is a huge time constraint for bookkeepers, so we made sure to fix it for you! But we didn’t just solve the problem — we completely eliminated expense reports altogether! Float users get quick-view access to the vendor name, the date and time of the purchase, the method of payment, the purchase amount and access to the receipt upload tool. By empowering managers to pre-approve company expenses and easily issue controlled corporate credit cards, employees no longer have to use their personal cards to make company purchases or be reimbursed. With automated receipt compliance on purchases made with Float, you’ll never have to chase down another receipt.
✅ No more manual reconciliations
Having to manually reconcile purchases is time-consuming, there’s guesswork involved and minimal control is permitted. Float offers an automated process that can be completed in a fraction of the time and easily uploaded to your accounting software. You can see the payment date, the method, the amount, the spender and the transaction status. It also allows you to easily upload files into your accounting software of choice with integration tools. The “Status” tab will let you know if the specific transaction has a receipt attached, if the GL code of the transaction has been uploaded to your accounting software and provide a description of the purchase.
Three key functions of spend management with Float
1. Accounting automation
Our automated spend management software is designed to reduce human error, eliminate cross-system reconciliations and save time for finance and accounting teams to focus on higher-value work. By increasing efficiency through automation, it enables faster decision-making at the company level.
2. Approval workflow
Our approval workflow processes allow companies to set up administrators who can approve and review company expenses. The administrator is directly linked to the card spend, which means expense requests and approvals are carried out before a transaction takes place. Our approval workflow processes can be integrated with communication tools such as Slack to speed up the request and approval time-period. It allows for greater productivity, increased visibility and control for budget owners, compliance protections for employees, audit trails of approval and adjustable budgeting.
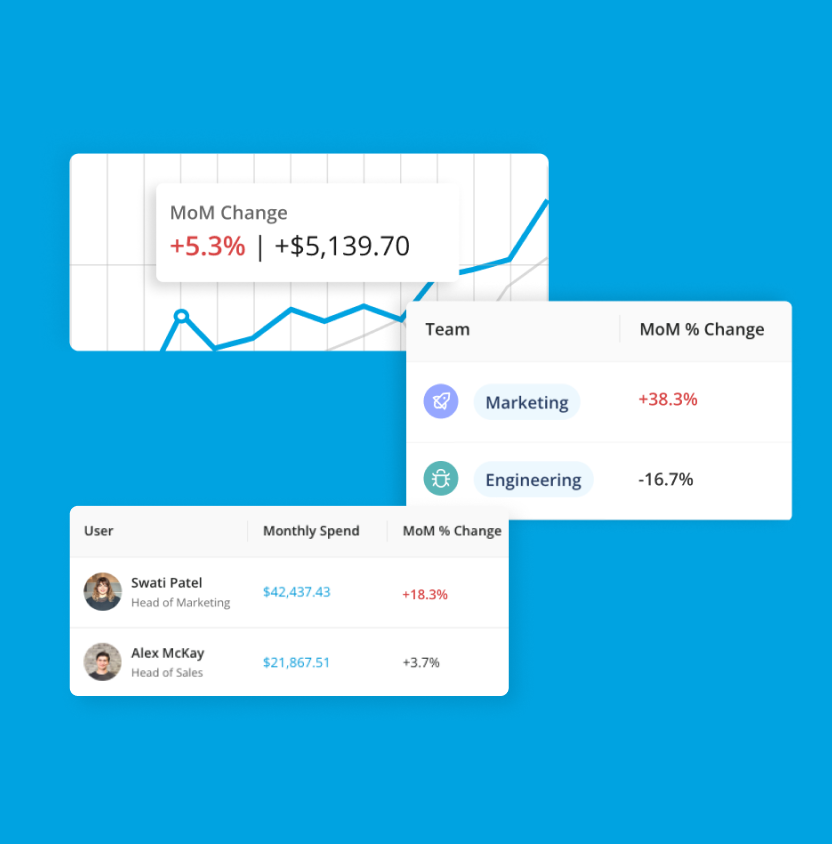
3. Real-time reporting
Real-time data increases the visibility of spend and access to key data insights on the spot. With real-time reporting automation, Float optimizes this process to be completed in a matter of days – no more waiting weeks to update the books. This simplifies month end and year end tasks and it also allows managers and administrators to track KPIs and better manage budgets.
Closing your month end books with Float
Float makes month end a lot easier with an array of features that simplify the process from start to finish.
Categorize & tag transactions: Most transactions are coded during the card creation phase or Merchant Rules Set Up. For missing transactions, you can easily go in and tag them accordingly.
Follow up for missing receipts: After a purchase is made, users will be instantly prompted to submit their receipt. If employees do not comply, we also have a “card pause” feature that auto-locks the card if a specific number of receipts are missing. If you’re not using this feature, you may have to follow up with employees directly to submit their receipts.
Bulk export transactions: This can be done through our Xero or QBO integration. If you are using a different accounting system, you can simply download a CSV extract, format the file to fit the requirements and bulk upload the transactions.
Helpful Float features and functions
⭐️ GL codes are designated and approved when a card is created
⭐️ Merchant rules help to categorize transactions with the option to override card rules
⭐️ OCR feature automatically extracts tax data from receipts instead of your accountant doing it manually
⭐️ QBO and Xero Integrations speed up the process and make things 10x easier
What to expect from Float
✅ Faster reconciliation versus the lengthy process with traditional credit cards
✅ Less categorization and tagging with the ability to apply GL codes in bulk
✅ Time saved tracking taxes using the OCR feature that pulls data automatically from receipts
How Float cards work 💳
Your Float limits = your bank balance. Float cards integrate directly with your bank account and automatically maintain your desired balance on your cards. You can connect your bank accounts and set up auto-top ups to ensure your cards never run out of funds. Float cards are accepted anywhere VISA is, which means you can use them for purchases just about anywhere.
Why is Float such a great option for bookkeepers?
Integrations. How we make Float work with you. 💡
Spend management seamlessly integrates with other software platforms and systems to make your financial processes simple and more efficient. We provide a direct integration with existing accounting software that uploads your Chart of Accounts as it appears in QBO or Xero. No need to retype or re-add data! We also give you the ability to classify tax codes and vendors before you export so that all the information is pre-populated within your software. Our support team is available to respond to inquiries and our help centre resources will walk you step-by-step through exporting. We also offer manual exports to download a .CSV or .PDF statement with receipts included.
Accounting (General Ledger) integrations
Our accounting General Ledger (GL) integration allows users to implement rules to automatically categorize transactions as they happen, which can later sync to the GL. We’ve developed a seamless process between Xero/QuickBooks and Float, where your Chart of Account and vendors are regularly maintained and updated inside your Float account. This allows you to export all of your expenses at month-end directly into the accounting software with the receipt. It requires you to spend less time on each individual vendor and improves speed and accuracy throughout the process.
Custom exports
While we don’t yet have Netsuite or Sage two-way integrations (coming soon), we do customize export and accounting settings for our customers who use these integrations. We do this by taking your master template and customizing your Float exports so that you can make a bulk upload into the accounting software.
Other integrations
Our Slack integration allows employees to request a virtual or physical card for future purchases by typing “/spend” in Slack. When a request is made by an employee, the administrator receives both an email and a Slack message where they can choose to approve or reject the request. The employee simply enters a request name, recurring expense option, purchase amount, the expiration date of the card and request description/notes. The administrator then has full visibility of these input parameters and has the choice to approve or deny the request.
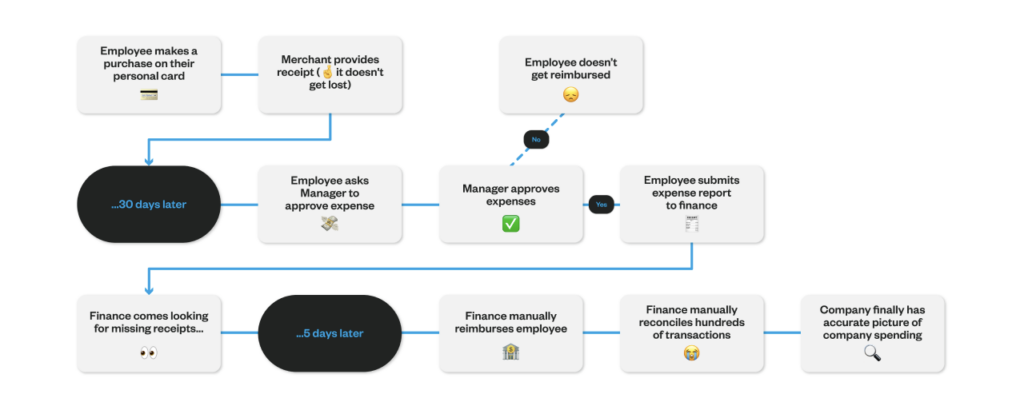
Does this process look familiar?
Corporate cards workflow before Float.
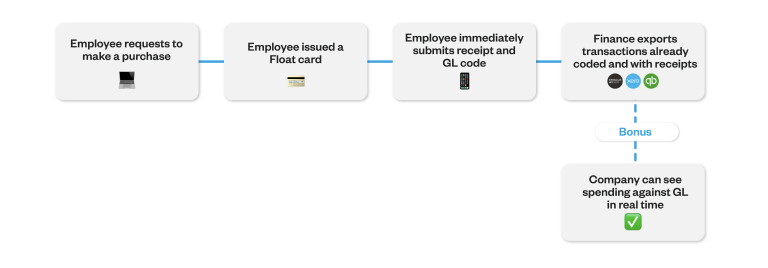
What about this?
💡 The Float Effect
Want to see it in action?
Categorize Transactions
Once you’ve made your first transaction with Float, you can view it on your Transactions page. From there, you can modify and prepare your transactions for an easy accounting export. This includes updating GL codes, making bulk transaction edits, attaching receipts, updating tax treatment and assigning vendors. You can also add custom tags or add departments to better track your transactions.
Receipt collection
Float’s automated receipt collection feature allows you to create automatic reminders for spenders to upload receipts and send recurring reminders every 24 hours until the receipt is submitted. If receipts are not collected in time, managers have the option to enable an auto-lock feature, which prevents the employee from making purchases until their receipts are uploaded.
Export transactions in QBO, Xero or CSV
If you’re using QBO:
Expense records are created on the export of every transaction and contain all details of the transaction such as categories, tax, receipt, description and the uploaded receipt/invoice.
Users must click “Transactions” and then click “Export to QBO”
The transaction amount gets debited to the appropriate expense GL account and credited from the Float Clearing Account in QBO account.
If you’re using Xero:
Invoices and payments records are created in Xero.
The record contains all of the details of the transaction such as categories, tax, receipt, description and the uploaded receipt/invoice.
Users must click ‘Transactions’ and then click ‘Export to Xero’.
If you’re using CSV:
While logged in to your Admin portal, navigate to “Transactions” in the left sidebar.
Select the transactions that you would like to export.
Hit the “Export to Excel” button in the top right of the page and select “Regular.”
Mark all transactions as “Exported.”
And that’s it! If you’re interested in using Float as a Bookkeeper for your clients, feel free to reach out to our team for a demo!
Overcharged and Overwhelmed? Not on our watch. Float has designed a feature that allows you to easily manage transactions from ALL your vendors.
A common pain point we’ve seen across many startups and SMEs is the struggle to keep track of multiple vendor payments made across departments. Let’s say your marketing team is racking up their Google ad spend and software subscriptions, while your sales team is expensing Uber rides and client lunches. When you’re scaling rapidly, this can be incredibly difficult to keep track of and it’s next to impossible to know what you’re actually spending. Now, imagine all of this with just one corporate card?
At Float, we’ve not only made it easy to issue multiple corporate cards in 3 days or less, but you can now code these cards to your individual vendors.
What’s in it for you?
👀 Full visibility of spending and transactions on the Float dashboard 🚨 Spot fraudulent transactions in real time ❌ Set limits on cards and cancel then instantly 🔎 Keep a pulse on subscriptions and reduce overcharges 💆🏼♀️ Close your books at month-end without all the stress 💳 Quickly replace and renew cards based on your growing needs 💸 Spend quicker without any downtime on your company’s operations
Greater spend control. Less stress and headaches.
If you’ve ever been double charged or charged incorrectly, then you know the headache that comes with getting it fixed. 🤯 You can avoid this altogether when you create a separate card for each of your vendors and set a hard spend limit. For example, if you know that your Zendesk subscription is $100/month, you can authorize a recurring withdrawal from Zendesk without giving them access to any additional funds from your account. The vendor will only be able to charge the preset amount that you agreed upon at sign-up and nothing more! 👍🏼
If any vendor tries to charge more, your Float card will automatically decline the transaction and alert you of this attempt. From there, you can simply connect with the vendor and inquire about the additional charge. Float also makes it easier to cancel your card if you’ve terminated a subscription or contract with a particular vendor. No confusion. No long wait times. No extra charges. ☎️ 🙄
Spend management has never been easier 🤩
For the Finance Team 👩🏻💼
Float allows you to have a “set it and forget it” attitude. You don’t need to keep a close eye on unauthorized transactions that may be going through because you’ve already pre-approved vendor withdrawals and set limits on every card. With the long list your finance team likely has going – Float gives them one less thing to stress about.
For Bookkeepers👨🏻💻
Using this feature, bookkeepers will already have the GL account pre-coded at the card level. This cuts down on time spent during month-end close because they don’t have to waste hours categorizing hundreds of transactions at the very last minute. Since GL codes can be approved the moment a card is created, bookkeepers can have the peace of mind knowing there aren’t any errors to look out for when closing the books. The accuracy is there but the stress isn’t!
At Float, we’re in the business of making spend and expense management a whole lot easier, quicker and more efficient for businesses. We know how stressful the process can be for finance teams, managers and even employees! That’s why we’ve designed each one of our features with you in mind.
Ready to level up your experience with Float? Don’t go anywhere – we’re about to let you in on all the tips and tricks. 😉
We’re in the business of making things easier, faster and more reliable for our clients at all times. To deliver on this promise, our team put their heads together to give you the latest hacks so you can make Float work for you at maximum speed and efficiency.⚡️
Hack #1: Tag transaction categories using merchant rules 🔎
Is your finance team sick and tired of constantly attaching GL codes, specific tags and tax codes to the same vendors and transactions? We have a solution for you! All you have to do is go to the Transactions page > go to the top right > select Manage Merchant Rules. Here you can automatically tag and assign whichever filter you want to a specific vendor so you don’t have to do it every single time. 🙌🏾
Here’s an example: anything purchased from Air Canada is most likely a travel expense. In instances like these, you can tag these recurring transactions as “travel” or “flights” and save time by tracking the same GL code to the same vendors.
Hack #2: Bulk edit your transactions ✅
Float allows you to edit, delete or modify multiple transactions all in one shot! This hack is especially helpful if you have a recurring set of transactions and vendors on a monthly basis. It speeds up month-end reporting and improves accuracy by eliminating the chances of human error and letting the software work its magic. 🪄
To bulk edit your transactions, go to the Transactions page, select a group of transactions and instantly apply the same GL code, tax code or any other key details. So if the majority of your employees expense Uber rides on their Float card, you would then go to Transactions > Ready to Export > Search “Uber” and mass select those transactions with the GL code: Transportation.
Hack #3: Mark receipts as lost 🧾
Missing receipts. It happens to the best of us. 🤷🏼♂️ Although Float provides the option to auto-pause cards after a specific number of receipts are missing, we also enable users to bypass the receipt locking feature and mark receipts as “lost.” This not only eliminates roadblocks on daily spending but it actually allows employees to go back and upload the receipt once it’s been found. Of course, you’ll want to be cautious of how often employees are using this feature to ensure they remain compliant with corporate expense policies.
To label a receipt as “lost”, go to the Transactions page > click on the Transaction > click Receipt Options > select “Receipt Lost.”